Interactive Halloween Cauldron: Lights, Fog, and Candy Magic
Last Modified: May 2024
For the last couple of years, a few houses in our neighborhood have handed out candy bags ahead instead of the traditional big bowl of candy. We like this idea but don’t want to hand it out at a table because that’s……..boring. Since we’re Makers, we will take a cheap cauldron from a party store and add some theming and effects.
Affiliate links are used on this page. See my disclosure page for info on affiliate programs.
Materials
3/4” and 1/2” Plywood Offcuts
2x4 Offcuts
Oats
3/8” Threaded Rod
Motor or Wired Drill
1 1/2” Exterior Screws
3” Exterior Screws
Fog Machine (I got a cheap one and wished I got a better one)
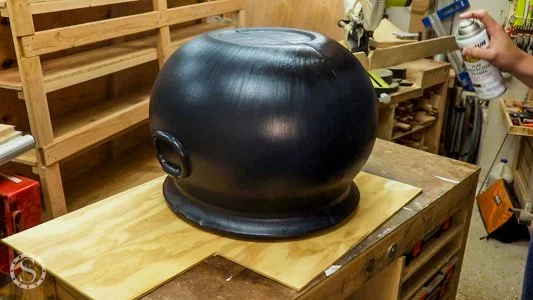
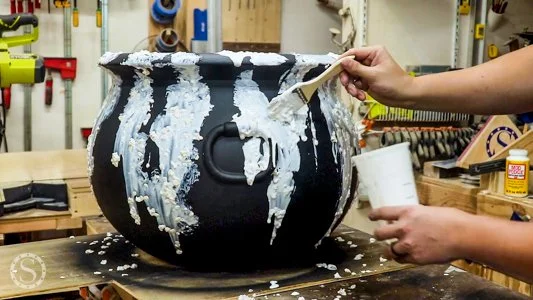
1 - Theme & Distress Cauldron
Making a themed and distressed project that LOOKS like a functional prop is far outside my comfort zone. My friends at Wicked Makers made a video a few years ago that I used heavily to make the cauldron look good. I’ll briefly discuss my steps, but check out their video for details.
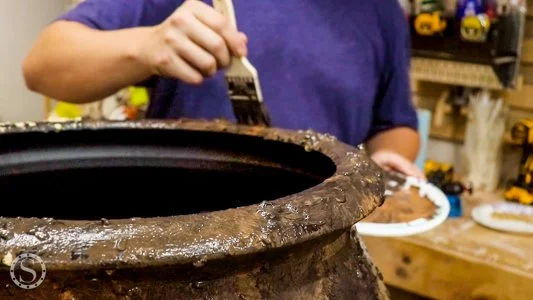
The short version starts by giving the cauldron a coat of matte black paint to remove the shine from the store. Mix some oatmeal and Mod Podge to add grit and grime (plus another layer of Mod Podge only to seal the oatmeal). Use the same brush to blotch black and brown acrylic paint over everything to simulate rust.


2 - Create Foam Skull

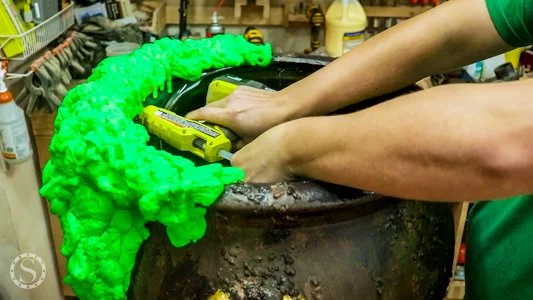
Add the outline of the skull to the front of the cauldron, making sure to add some big drips around the edges. Add some large details for the eyes, nose, and some teeth slits.
Use the spray foam insulation to add the skull. I found that having the foam be more vertical than horizontal made it look like poison was flowing over the rim. Add the foam everywhere within the outline. For the detail gaps on the inside, try to creep up on the line so you don’t have to make too many adjustments.
Don’t panic if you need to make some adjustments. For the openings, the foam can be moved a little with scraps while it’s wet. Try to move it as soon as possible, though, while it’s still sticky and hasn’t cured.

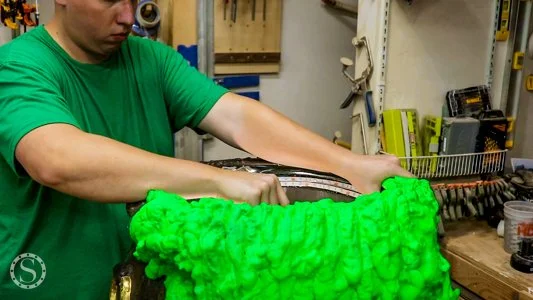
You can also always use a saw and files to remove material. In my first pass, the “forehead” was too large, and I had applied it horizontally, which looked terrible. I removed the foam with a saw below where I wanted the foam to end up, then cleaned up the edges with files. I removed enough so I could add another layer without it being too thick.
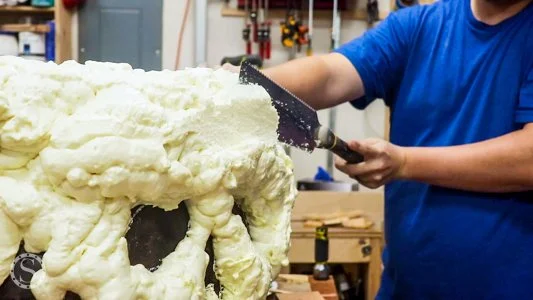

I also used a utility knife to widen out some of the teeth gaps. Since these were already so small, I didn’t add any additional foam.
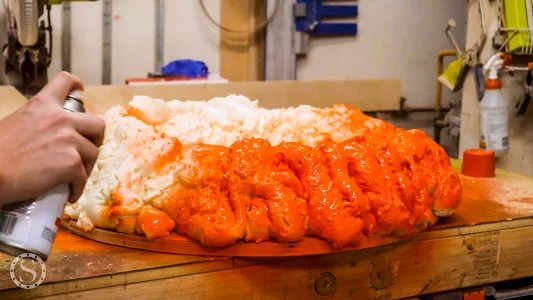
3 - Paint Skull
Tape off the cauldron as much as you can. We’re going to clean up the paint, so don’t worry about making it too precise. We’re just trying to lighten the clean-up burden later. Use brown paper or newspaper to mask off large areas.
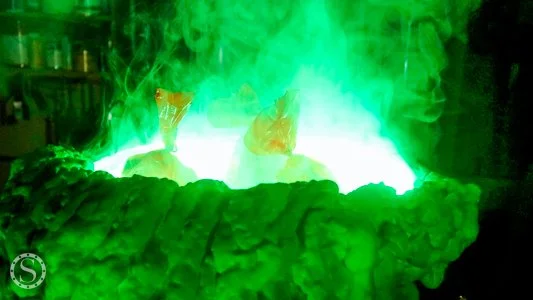
Spray the skull with neon green paint. Test the spray paint on some spare foam before spraying the skull. My paint didn’t eat away at the foam too much if I kept the can a little further away than usual and did light coats. I could also use this to add some texture by varying the distance.


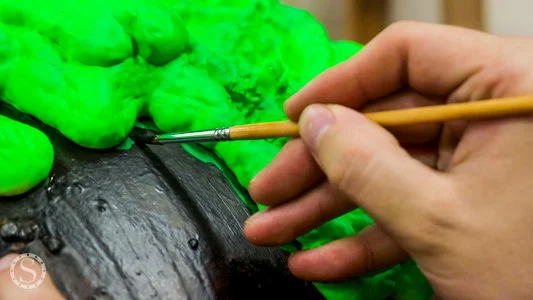
Spray a couple of light coats to cover the skull. After your last coat, immediately remove the tape and masking. Go back with some of the brown and black paint and carefully touch up the paint around the foam. Don’t skip this step; try to blend the paint as much as you can. The dark cauldron and bright skull contrast nicely.
I also took this time to add some metallic paint to the cauldron “handles.” The metallic paint made them stand out; it is just another detail that helped break the cauldron up.
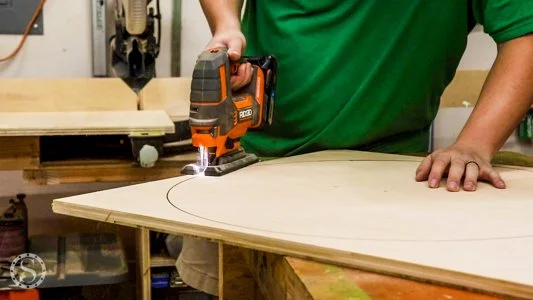
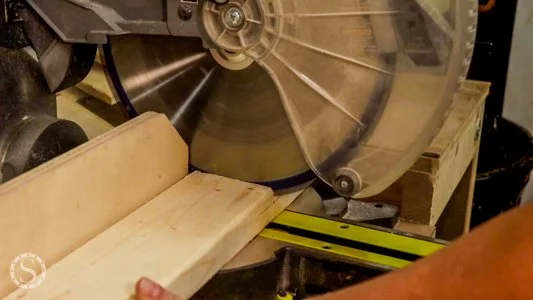
4 - Build Base Platform
We need to build a base to add some weight to the cauldron. I used some large plywood and 2x4 offcuts for this. Cut a large circle slightly wider than the broadest part of the cauldron, then another as wide as the bottom. Cut some 2x4s as spacers between the two to add a little height.
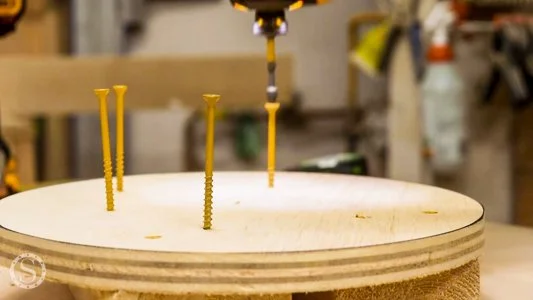
Install the spacers and small circle roughly centered on the large circle with exterior screws. We won’t see any of this, so it doesn’t have to be perfect. I made it easier on myself by picking screws that would go through all pieces at once.
5 - Create Base Embers
Loosely wrap the lights around the center of the base. You’ll want the lights close to the top of the foam, so don’t tighten the lights.
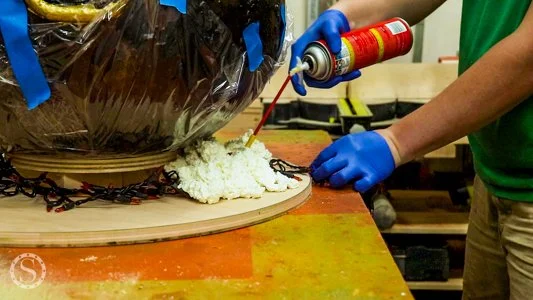
Add some plastic wrap to the bottom of the cauldron to protect it from the foam, then place the cauldron on the small circle. Add more expanding foam, again in vertical paths, so it covers the lights and the entire base. You’ll also want to let the foam expand up onto the cauldron.
Remove the cauldron once everything looks good, but the foam is still sticky. This should let the foam stay formed to the cauldron but not stick to it, so we don’t have to do further touchups around the foam.
Once the foam is dry, lightly spray it with a single coat of orange paint. You’ll want everything covered but not too thick so the lights can still shine.
Once the orange is dry, lightly go over everything with black spray paint as well. You’re trying to make the high parts black, but the cracks and gaps will stay orange. When you’re done, this should look like embers. Keep a light touch on the black. You can always add more, but it will be difficult to layer more orange and more black while keeping the lights coming through the paint.

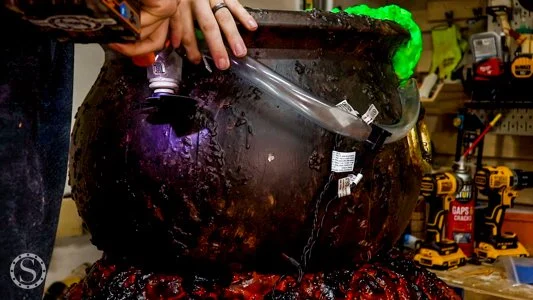
6 - Install Fog Hose & Lights
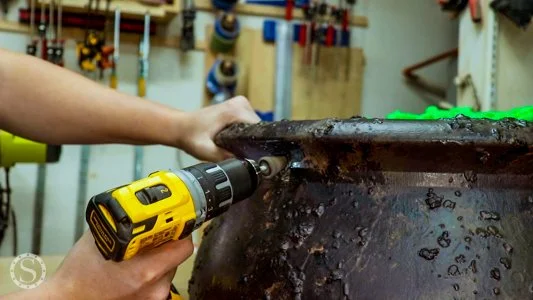
Drill an angled hole in the back of the cauldron just under the rim. I used a power carving burr to widen it until the hose fit at an angle.
Use some hot glue to close the end of the hose. Route the hose through the hole and hide it under the rim. Once it’s in place, use hot glue to keep it there. I started at the stopped end and worked my way back around to the hole. Once everything was in place, I added a thick bead to ensure it couldn’t move.
Add the LED light strip through the same hole. Mine had a terrible adhesive backing, so I also used hot glue for the LEDs. I made three passes around the cauldron rim, both under and over the fog hose, but not directly over it. The LED layers will let the fog come out of the hose and (hopefully) illuminate it nicely.
7 - Test Fog
Before finalizing the fog hose and lights, test the fog. Drill a few small holes in the fog hose to direct the fog into the center of the cauldron. I drilled about eight small holes, then widened them out and added more holes, so I had about 32 or so.
There are many videos on YouTube about different types of fog, so I’ll leave the details of the differences to more well-versed haunters. It seems that fog can be divided into three general categories with a few variations: haze, fog, and dense fog.
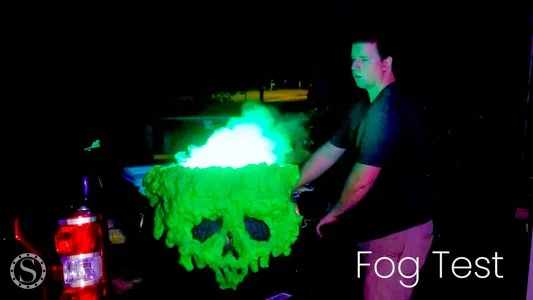
Haze generally adds an even, light atmosphere. It is used at many concerts so that you don’t really notice it’s there, but you can see the paths of light.
Fog is produced by most fog machines, which are widely available for holidays and parties. It is thicker and more intentional than haze but generally still pretty light, wispy, and fast-moving. Fog is also usually a little warm. The fog machine I purchased produces this kind of fog.

Dense fog is a chilled version of the fog above. It is thick and heavy, which causes it to cascade over things and move slowly over the ground. You can get dense fog by running “regular” fog through a chiller and routing it from there.
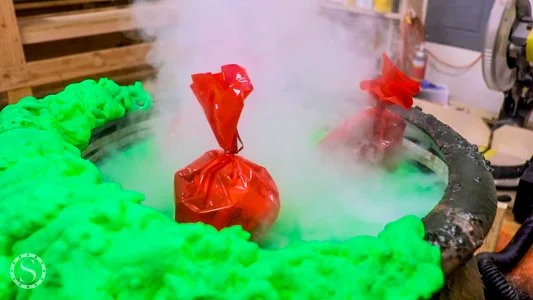
I drilled several holes in a small cooler and built a platform to hold the ice. I tested the fog with and without ice. I liked how the dense fog looked but couldn’t get it out of the hose how I wanted. If I had more time, I would figure out how to route the dense fog. However, the regular fog routed correctly and still looked pretty good, so we used that.
8 - Build Candy Platform Mechanism
The last effect we want to add is a moving platform inside the cauldron for the candy to sit. The platform needs to spin so the bags look floating around a poison potion.
I measured the cauldron opening to see how wide a diameter I had to work with, then cut two plywood circles out of some offcuts. We will also use some roller casters to support the moving platform. Place one circle in the cauldron, then the casters, then the other circle to measure how tall some supports need to be so the platform is the exact height you want.
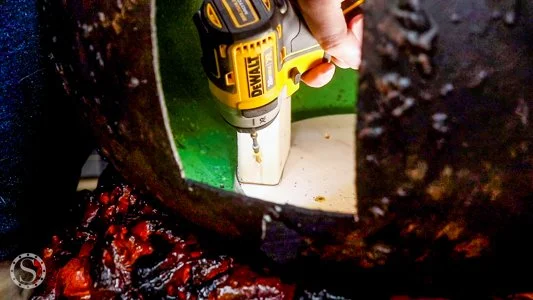
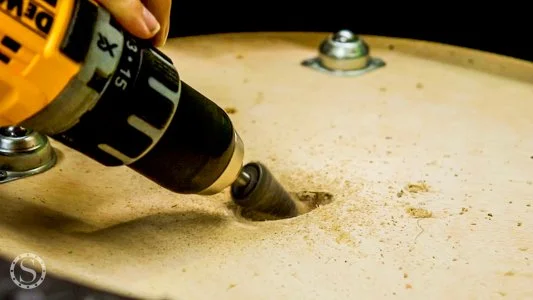
We need to cut an access hole in the back of the cauldron so we can access the motor. A multitool with a semi-circle drywall attachment makes quick and accurate work of the plastic. Cut the panel so you can comfortably fit your motor, hand, and some of your arm in the hole. My motor is a cheap corded drill, so I estimated with that.
Grab the circles out of the cauldron and cut your hole in the middle through both simultaneously to keep them aligned. The hole should be small enough so your threaded rod will screw into the hole. Grab the base circle and drill an oversized hole so the rod fits loosely.
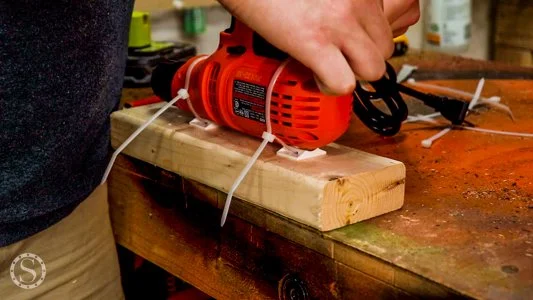
Since I’m using a drill as my motor, I need to secure it to one of my 2x4 legs. I used some zip ties and zip tie mounts so the drill stays in place but is removable without too much effort. Cut the threaded rod so that it will screw into the top platform and have enough length to go past the casters, through the bottom platform, and have an inch or so extra for the drill. I used an angle grinder with a cutoff wheel, then cleaned up the cut with a flap disk. Screw the rod piece into the top circle, make sure it’s perfectly vertical, then make it permanent with some CA glue.
Grab each leg a partially drive a screw at a steep angle.
Install 2 of the legs on either side of the panel opening toward the back using at least two screws in each leg. Zip the drill to the third leg, place the assembly in the cauldron, add the bottom circle, and center it. Insert part of the threaded rod offcut through the hole and into the drill. Mark where the leg needs to go so that everything is aligned. Remove the rod and bottom circle, then install the final leg with several screws.
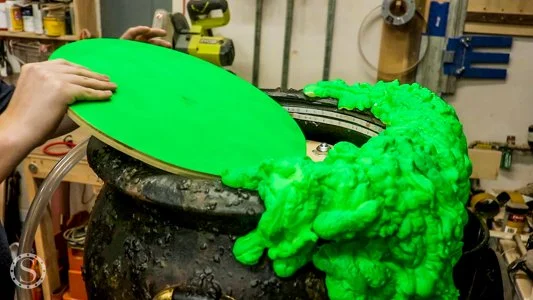
Add a layer of green spray paint to the surface of the top circle. Add the bottom circle back on top and re-insert the rod offcut to align the circle. Drive a couple of screws through the bottom circle into the 2x4 legs to make the connections semi-permanent. Install the casters on the bottom circle, then slide the top circle in place. I needed to add a small trough so the rod could slide in around the skull foam.
9 - Touchup Paint
Doing all of the breakdown and construction around the cauldron caused some paint to chip off. Some areas also just started separating and peeling off. For the peeling sections, I used some CA glue to re-secure them, then added paint to the edges to re-blend them with the other paint. I added some paint for the chipped sections and tried to blend it as much as possible.
I also decided that the metallic paint on the handles was too bright. To tone it down, I need to add some grime to them again with a black wash, which is very watered-down black acrylic paint. Put as much wash as you can on the handle, immediately wipe it off, and repeat several times. The water will let the paint flow into recessed areas where dirt typically gets.

I was thrilled with how the cauldron came out! I learned several new techniques and played with new materials I hope to use in future projects. I enjoy projects that hit several goal boxes I’m working on for future projects.
We solved a problem
We used a unique and creative solution
We used a new technique or material (in this case, both)
All materials and tools are commonly available
I’m still working on this list, but that’s a preview of where I think things are going more formally. The cauldron was also a HUGE hit with our neighborhood’s trick-or-treaters!
