Building an Efficient Dust Collection Arm for Your Shop
Updated: April 2024
Do you always use your dust collection/shop vac when using handheld tools? Or do you clean it up later like I used to? I always noticed better results when attaching my dust collector to handheld tools like sanders and routers, but the hose always got in the way. To keep it out of the way, I made a dust collection arm that brings the dust collection to me without taking up any floor space. Hooking it up and getting going is more convenient than ever, so I am much more likely to use it!
I have free plans for this project available here.
Affiliate links are used on this page. See my disclosure page for info on affiliate programs.
I have created an Amazon Idea List that includes all the most critical tools and materials outside the Maker Pipe Connectors.
Tools Used
Reciprocating Saw (or Pipe Cutter)
Metal File (or Angle Grinder)
Jigsaw or Coping Saw
Level
Materials
3/4” EMT Conduit
3/4” Pipe Flanges
3/4” Plywood Scrap
Silicone Oil
#8 Machine Screws
#8 Lock Nuts
#8 Washers
1 1/4” Deck Screws
Zip Ties
Magnets with Hooks
Maker Pipe Fittings Used
Provided by Maker Pipe
What Went Wrong
In the video, I made two attempts to make the Dust Collection Arm, but only the second was successful. My initial design was a bit overcomplicated, which led to its failure. I simplified the design, which removed the weak point and worked exactly how I needed it to. The build steps are identical for both but with fewer pieces.

During the steps, anything different between the builds is highlighted separately like this.
1 - Rough Cut Conduit to Length

Starting with the longest pieces, cut all of the EMT to length. Leave the diagonal a little long, though; we’ll cut it to the final length later. I used a reciprocating saw with a metal blade, but a hacksaw or pipe cutter can also be used.
Once you cut all the parts, smooth the rough cuts with a metal file and de-burring tool. I used an angle grinder with a flap disc for the outer edges to speed up the process.
The first attempt design had three pieces that needed to be cut long, not just the one diagonal. There were two diagonal pieces and a middle bar. All three were cut using relative measurements.
2 - Dry Fit Frame Assembly

Assemble the conduit and Maker Pipe Fittings on the ground or a large workbench. Use a 5mm Allen Wrench to tighten the nut and bolt on each fitting. Try to keep the parts square as much as possible during this to make the relative measurements easier next.
While only 1 diagonal piece will be long in the second attempt, the first had three. To make the marks easier to make, all of the long pieces were long at the top of the middle bar.


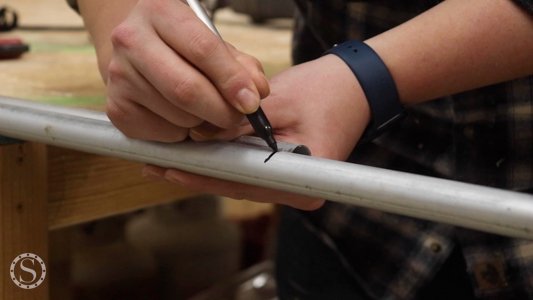
3 - Mark & Cut Long Pieces to Size
While most pieces are cut to the correct size, we need the diagonal to be cut to size. With a sharpie, mark exactly where each piece should be cut so that it fits perfectly.
Disassemble the arm parts, leaving the vertical mount together for later. Cut the arm pieces to the final length and re-assemble the arm itself.
Since the first attempt had 2 different parts to the arm, the re-assembly was in two halves. One half had the vertical bar, one bottom piece, and one diagonal, which the other had the other bottom and diagonal coming to the end. This was easier to do in parts for final assembly later.


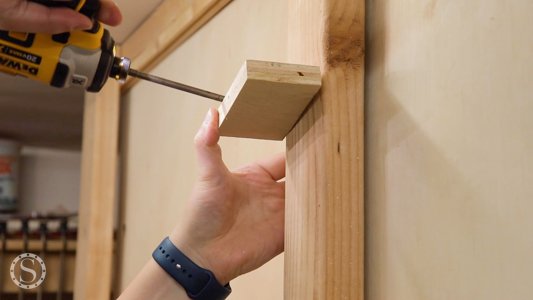
4 - Mark & Drill Mount Countersinks
Use the still assembled Vertical Bar to mark the holes in the 2x4 the arm will be mounted into. If you’re mounting to a wall, cut some scrap to be used against the wall as a mount. Ensure the Vertical Bar is plumb in both directions to prevent the arm from moving later.
Once marked, drill holes with a 15/16” spade bit. The conduit will go through the 2x4 for some extra strength. If installing it on a wall, mount it to the wall now.


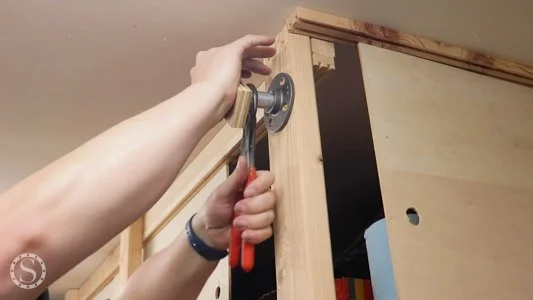
5 - Install Flanges
Secure the 3/4” Pipe Flanges to the 2x4 Mount with 1 1/4” Deck Screws. To help with alignment, use some scrap conduit or the Short Mounts to ensure the Flange hole and drilled holes line up. Deck screws are self-tapping, so they should not need pilot holes.
Add the Short Mounts to the flanges, ensuring they seat into the 2x4 Mount. It should be a tight fit.
I first attempted to add threads to the Short Mounts before adding on my overhead storage. However, once the conduit is in, it is very difficult to remove. It’s better to mount in place once to lessen the chances it can be removed later.

6 - Add Friction Bands

The Maker Pipe fittings have a piece of Friction Band on one end, which will help keep the conduit from swiveling when we don’t want it to. Add a friction band to the conduit for all stationary parts that do not already have friction bands on the fittings. Use a heat gun to shrink the bands to size.
We don’t want any friction bands on all pieces that should move. Remove them from the Maker Pipe fittings as necessary to allow the conduit to move as needed. Don’t forget to add them to the arm and the Short Mounts.


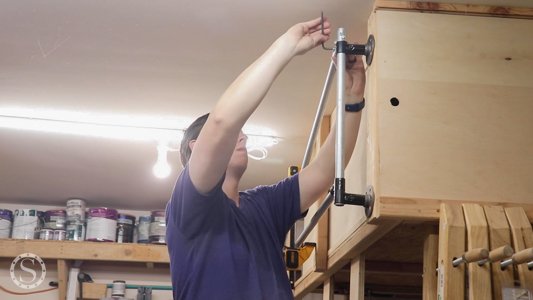
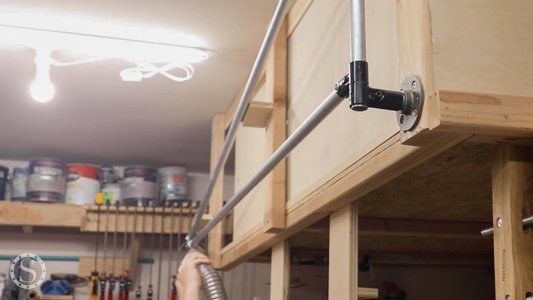
7 - Install Vertical Bar
Install the still-assembled Vertical Bar to the short mounts on the 2x4 mount. Once both T-Connectors are on the Short Mounts, tighten just enough to hold it in place, double-check for plumb, and then tighten fully.
8 - Install Arm Assembly
Bring the Arm to the Vertical Bar and insert it into the fittings. Tighten all the Maker Pipe bolts with the 5mm Allen Wrench. The long Arm can be difficult to handle alone, so clamps might help keep it in place while everything is secured.
Since the first attempt had an extra pivot in the middle, I added the top half and bottom half separately.

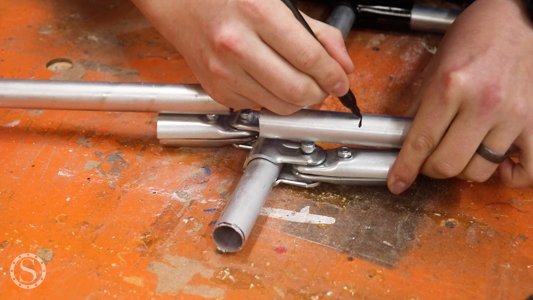
9 - Reinforce High-Stress Joints

Even though the arm doesn’t have a ton of weight it will be holding, due to leverage, the diagonal piece will have extra stress on it to keep things in place. I reinforced most stationary joints by drilling holes through the Maker Pipe fittings and EMT Conduit. Once drilled, I added an 8mm bolt through the holes and secured it with a washer and lock nut on the other side. The bolts will make those mechanical joints instead of friction-only joints, adding strength to the arm.
I found this the hard way with my first attempt. During a test, the upper diagonal pulled right out of the Maker Pipe fitting. While the first attempt still failed after reinforcement, it did still add enough strength that I still did this with the second attempt.


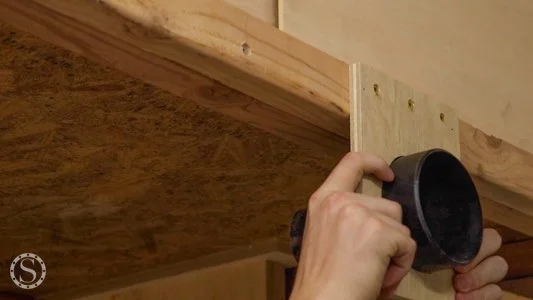
10 - Cut & Add Plywood Supports
Since the arm is under stress, I cut a piece of scrap plywood to roughly 2” x 4” to support the arm when not in use. Once cut, drill some pocket holes in the piece and add them so the armrests are on it. I marked it on my overhead storage, then secured it with pocket hole screws.

11 - Add Hose to Arm
Using the 4” Hose Clamps, add the Dust Collection Hose below the arm. For ease, keep the hose clamps a little loose while adding the hose, then tighten once it’s where you want it. You can also use zip ties to keep the far two hose clamps from moving around on the arm.


How you connect the arm hose to your tools and your dust collection will be a little different for everyone. I added a 2 1/2” to 4” dust collection port to the mount end. The port is mounted to some more 3/4” plywood scrap so I can connect directly to it above my dust collector. On the far end of the arm, I added a Tool Hose Kit and used some hook magnets to hang it from the metal hose clamps when not in use.


One unforeseen benefit of this project was a lesson in simplification. My original design was overcomplicated, creating a weak point in the arm: the middle pivot. The solution was to simplify by removing the middle pivot. This strengthened the arm as a whole, and it is now working exactly as expected.


Even with that simplification lesson, I’m happy with how the Overhead Dust Collection Arm came out. I now have a dust collection readily available in most of my workshop without running hose everywhere, and it’s completely out of the way.
