Power Carving a Deadpool Headphone Stand
Updated: May 2024
Are you intimidated by trying new techniques in your shop? I love learning new things and tend to throw myself directly into the deep end. I use headphones while editing so our toddler doesn’t wake up, and I wanted a place to store them: a Deadpool Head. We’ll use Padauk for the red and wengie for the black to avoid staining. This project will also be my first attempt at power carving.
Affiliate links are used on this page. See my disclosure page for info on affiliate programs.
Tools Used
Materials
Padauk Hardwood
African Wengie Hardwood
Pencil for Dark Wood (what I recommend now in 2024)
Paint Marker (what I used)
2 Part Epoxy (if needed)
Black Epoxy Tint (if needed)
White Paint
Total Boat Lust Varnish (Seemed fitting for Deadpool)
Kutzall Tools Used
Provided by Kutzall
1 - Mill Hardwood
Like most other hardwood projects, start by milling the padauk and wengie to their rough sizes. If you do not have a jointer or planer like me, you’ll save yourself a few headaches by sourcing hardwood surfaced on 4 sides (S4S). If you have a planer and jointer, plane one face flat, joint one edge square, then plane the other face perfectly flat.
Once everything is milled, move to the miter saw and cut to the rough length. Use a stop block to ensure the padauk and wengie are the same size (this will help when gluing up). Then, rip the padauk to the final width at the table saw. Don’t worry about ripping the wengie. We won’t keep it square for long.


2 - Glue Up Small Blocks
Ultimately, we’ll have 9 layers of hardwood. The glue-up will be MUCH more manageable in smaller batches of 3 layers. Start with the padauk and make 3 blocks with 3 layers each. Add a thick layer of glue between each piece. Taping the edges will help the pieces stay aligned better when clamps are added. Use as many clamps as possible to ensure the faces are tightly secured.
Glue up the padauk as square as possible, then glue the 3 layers of wengie into a block. Give the blocks time to dry overnight.


3 - Cut Out Eyes & Glue Up
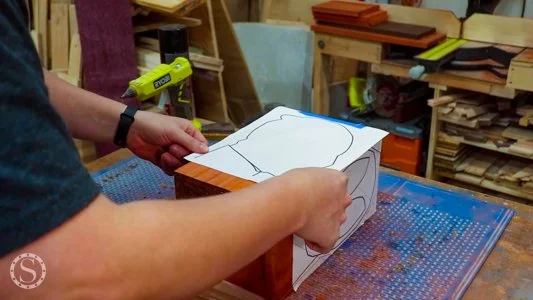
Currently, we have 4 blocks and only need 3. The wengie will be inlaid into the top layer of the padauk. I printed a template head and glued it to the padauk with spray adhesive. This gave me the perfect line to cut out. Cut the eyes out at the bandsaw. Don’t worry about the entry lines. They will glue up seamlessly later.


To make the wengie inlays fit tightly, mark the padauk holes directly on the wengie with a white paint marker. When cutting the wengie out at the bandsaw, stay outside the line.


Dryfit the wengie eyes into the padauk. As needed, sand down the wengie at the oscillating sander. Start by sanding to any remaining white paint marker, then use the dry fit to find where to sand down.


Once the eyes are fully flush and tight, liberally apply wood glue to them, then clamp the wengie eyes in the padauk. Make sure to add glue to the padauk bandsaw entry cuts and clamp tightly. Once dry, these lines will largely disappear. Let the eyes dry overnight.

4 - Glue Full Assembly
Apply a healthy amount of glue between the 3 padauk blocks. Make sure the eyes are on top. Once everything is in clamps, you’ll want to give the glue at least 24 hours to dry. The power carving will put stress on the glue joints, and any tacky glue will gum up the power carving tools.


5 - Profile Bandsaw Breakdown
Once the glue is dry, pull the assembly out of the clamps. To lessen the amount of wood turned into sawdust, we can rough in the front and side profiles at the bandsaw. Because the block is so thick, you'll need a wider bandsaw blade.
I used two different head printouts to make this easier, keeping them secure with spray adhesive. Start with the head face up and cut the sides off. Once the sides are off, we’ll need to temporarily re-secure them. Use hot glue to re-add the cutoffs.


Once the sides are back on, add the other profile printout and cut out the side profile. Once all the cutting is complete, use a chisel to knock off the hot-glued sides.


6 - Rough-In Shape
It's time to start power carving! We’ll start with the angle grinder and the fine Kutzall shaping disc. Since we had so much material to remove at the beginning, I started with the extreme shaping disc by removing all the angles and adding some roundness.

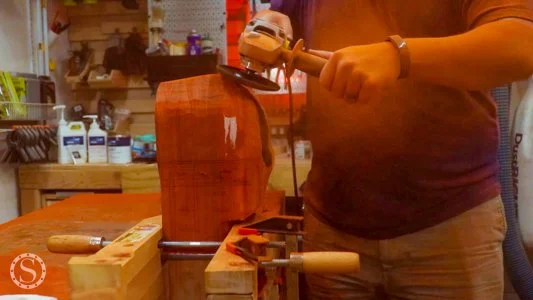

Take your time roughing everything in. You can always remove more material, but adding wood back seamlessly will be much more difficult. I quickly switched from the extreme shaping disc to the fine disc.
I brought the face down so the nose had some height, rounded the head much more, and added concave slopes to the sides of the head and around the chin. Using some reference images was a lifesaver for me (although I cannot share the exact images I used).


7 - Refine Head Shape
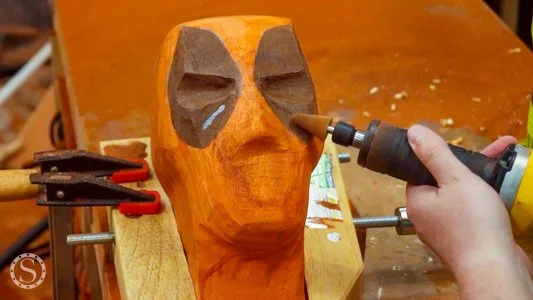
Details are easier to add with the die grinder. Unlike with the shaping discs, I jumped straight to the fine burrs. Having a few different profiles will help with the details later. For now, use the ball nose and taper burrs to refine the shape. The ball nose is better for larger areas and round corners. The taper will be easier to get further into the head without the die grinder's handle interfering.


The die grinder burrs will be the best way to refine all the edges and round-overs. Keep the burr moving to prevent the wood from burning or removing too much material. Use a pencil to mark where you want to remove material and where you want to remove material. For a dark wood like wengie, I added some white paint marker as well, so the lines stood out better.


8 - Add Eye Sockets & Details
Here is where a light touch is better than an aggressive touch. Use the white paint marker to mark the eye socket insets. Start with the cylinder burr to have a clean, tight corner. Carefully carve away until the eye socket is to the depth you want, then pull the walls back to keep the bottom flat.
Switch to the taper burr and add a slight round to the socket. I also added some accent grooves under the eyes. I found this in a couple of reference images, but not all of them. I recommend adding them, but not as deep as I did.


9 - Epoxy Cracks as Needed
I unfortunately had some large gaps between the wengie and padauk. I mixed up some 2-part epoxy to seal these up and dyed it a very dark brown. Ideally, an epoxy syringe should be used to inject the dyed epoxy into the cracks. Use toothpicks or bamboo skewers like mine if you don't have syringes. If you have gaps between padauk layers, dye more epoxy red and fill those.

Give the epoxy plenty of time to dry. Different brands and types of epoxy have different cure times, and the temperature and humidity in your shop can also impact cure time.
I needed to apply a couple of layers of epoxy to ensure the gaps were fully filled in. This can happen as the epoxy dries and seeps deeper into the gap.
10 - Carve Misc Other Details
Switch back to the taper burr to carve away any epoxy over-pour (there should be a good layer to ensure everything is filled). The fine burrs are great for carving epoxy as well as wood. We can add some small indents under the eyes with the epoxy carved down. I made mine too deep, so try to use a light touch.
The final detail to add is Deadpool’s signature head fabric tuft. First, I had to dig this out with the angle grinder and fine-shaping disc. Once I removed more material, I went back to the die grinder and taper burr. I also gave more shape to the back of the head and neck area to make each section more pronounced.


11 - Apply Finish
Because the finish was so smooth off the fine-shaping disk and burrs, I barely sanded the Deadpool head. I went over the epoxy gaps with 220 grit and briefly over the rest of the head. If you do sand, wipe all dust off the head with shop towels and mineral spirits.

The only paint on the entire project is the whites of the eyes. Carefully apply the paint from the center, pulling to the edges. This should minimize any fuzzy edges that need to be cleaned up.
Using a sponge brush, apply varnish to the Deadpool head. I used Total Boat Lust Varnish, which just felt appropriate for Deadpool. Because so much of the head is end grain, you’ll want to apply at least two coats, if not more. Ensure the whole head has consistent coverage, applying additional thin coats as necessary.


Honestly, I was extremely happy with how my Deadpool head turned out. This was my first power carving project, and I was very nervous about starting it. It was great to learn a new technique and skill. Hopefully, this gives you the confidence to try a new skill, like power carving, for the first time. You’ll be surprised how much fun it is, and if you’re like me, you’ll want to start incorporating power carving into more projects in the future. It’s a fantastic skill to add to your tool belt.

