Bent Wood Laptop Tray: A Challenge-Inspired Build
Updated: April 2024
The Bent Wood Laptop Tray is my official entry into the Rockler Bent Wood Challenge presented by the Modern Maker Podcast. Challenges like these always push me to build something already on my list, but do so in a manner that pushes me outside my comfort zone from a design or making standpoint. This one did both!
Affiliate links are used on this page. See my disclosure page for info on affiliate programs.
Materials
1/4” Plywood
Sandpaper (a sanding block is helpful)
1 - Cut Form Components to Size

Before any work on the main build can be done, the first phase of the form must be built. I started out by using my circular saw and track jig to break down the plywood to size. The dimensions do not need to be exact as long as both sides are identical. After the plywood sides are cut to size, I cut some spacers from decking scraps. I ensured the spacers were short enough to allow room for clamps on the plywood edges outside the plywood sides. To prove my form in the future, I cut enough spacers so every form component at the end will have at least one spacer.
2 - Mark & Cut Form for Top Glue Up
Once all form components were cut to size, I could move on to the first splitting of the form. I wanted to start with the top since it will span the entire length of the finished piece. Since the form will not be part of the final, finished piece, we can draw the top design directly on the form.


To ensure both sides were perfectly identical, I stuck the sides together with some blue tape and CA Glue. The tape will ensure the glue does not stick to the plywood permanently, and the two sides will separate as needed after cutting. I also used an accelerant so the CA glue would cure in just a few seconds.
Once the glue dried, I used my jigsaw to cut both form pieces at the same time to ensures that both sides will be identical.

One of my sides was not identically cut to the other. I marked the curve on some paper, cut it out, and transferred it to the other side. I, again, used my jigsaw to cut off the small discrepancy. I used the CA glue and accelerant to attach the cutoff to the other side of the form.


I could start the full-form assembly with spacers with the plywood sides complete. I used the spacers to mark where they would go on one side. I then drilled a pilot hold for three screws in the plywood sides. This allowed me to drive the screws partially into the form, then hold the spacer into the protruding screws and complete the full drive.


To give the clamps something to hold onto, I added some clamping blocks with CA Glue and screws. These will hopefully help keep the laminations tight.
3 - Breakdown Top Plywood

Now that the form was assembled, I could use my fabric tape measure to measure the total length of the top. The fabric tape is flexible, allowing it to hug the curve the exact way I needed. I then used my miter saw to cut each piece down to its rough length. At this point, I knew I would have to flush up the edges, so I kept the length oversized by an inch on each side.
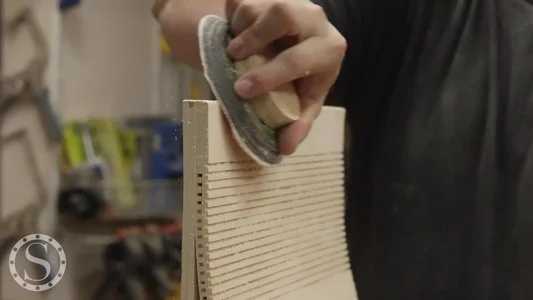
I also used the fabric tape to measure the start and end of all the kerf cuts. The top must bend in two opposing directions, so the kerf cuts must be on opposite sides of the panels. I made sure to mark which side of the panels the kerf cuts would be on. Once marked, I could line up the marks on my table, see a crosscut sled, and cut most of the way through the panels. This will allow the panel to bend without breaking. I made kerf cuts along every entire curve to highlight the cuts in the design.


My design will have two continuous layers in every section. In most areas, except the leg openings, two sections will be glued up for four total layers. For the top, I cut two identical pieces that span the entire top with additional room to flush up the layers later.
4 - Glue Up the Top
With all the top components broken down, I could finally start the first part of the glue-up. The top was by far the easiest layer to glue up. I spread glue on one panel, then laid the next panel on top. Once both panels were in place on top of one side of the form, I could add the corresponding form side and begin to clamp. I used traditional clamps to keep both sides of the form tight to each other and several spring clamps along the edges to ensure all edges had good glue adhesion.


I left the laminated layers clamped in the form to cure overnight with all clamps tight to ensure the layers adhered as expected.
5 - Breakdown & Saw Form for Middle Glue Up
Once the top is dry, I can remove all the clamps, leaving a partial top and large form. I broke the form back down so I could re-sandwich the bottom part back together with CA glue and blue tape. Back together again, I could cut a blank out for the bottom middle of the laptop tray.


I re-assembled the new middle form and decided to drill holes in the form for the clamps to grip onto instead of blocks. The holes worked for this part better than the blocks and helped keep the glue up just a little tighter.
I used my fabric tape again to measure and mark the plywood for length and kerf cuts.
6 - Cut Middle Plywood
I used my fabric tape again on the middle form to mark the plywood for length and kerf cuts. The middle is a little easier than the top since it only curves one way; all of the kerf cuts are made on the same side of the piece. I did find it helpful to ensure the plywood was properly supported during the cuts. This helped to prevent the whole piece from snapping on some of the last kerf cuts.


7 - Glue Up the Middle

The glue-up for the middle was easier than the top. The cuts on one side were helpful, but instead of sandwiching the curves between the forms, I clamped only the main curves to the middle form and skipped the sandwiching. The only additional complexity was clamping the whole middle to the top. This was not difficult, but long clamps were helpful to keep everything tight and out of the way of other clamps.
8 - Final Form Cuts for Sides
Like the middle, I only broke down the form I still needed to cut, the bottom sides. I broke both down, re-sandwiched them, and marked one for the additional cut for the final side pieces. After this, the first side was cut, and I used it to mark and cut the opposite form piece. Using one side to mark the other is an easy method to increase the likelihood that both parts will be identical.
After cutting both sides, I reassembled them. In case of some slight variation, I made sure to keep each side oriented correctly and with the large form where it was cut off.


9 - Breakdown Side Plywood

Like the top and middle, my new helpful tool, the fabric tape, could show the plywood length and kerf cut locations. The sides were easy to cut with kerf cuts because each piece had only one curve. However, there are four side pieces, not two like the other sections. Again, I kept each side separate to counteract any variations in curves or markings.
10 - Glue Up Sides
The sides were even more easy to glue together than the middle. The top and middle could stay clamped to each other. Then, I used some spring clamps to align the feet for each layer as I laminated it. Once each side piece was glued to the middle and top, I returned with spring clamps along the edges to keep all the seams nice and tight.


11 - Flush Up the Exposed Edges
One trick I never knew before making things was flushing pieces up. I assumed makers had to keep pieces aligned manually. Instead of keeping a large lamination aligned, I gave some extra wiggle room to flush up the edges. I initially thought a sander would do the trick, but I quickly tried my power plane. This made very quick work of the edges, leaving little to no tear out.


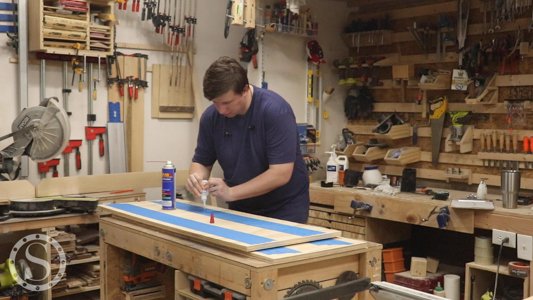
12 - Sand & Finish
The piece is almost complete, but smoothing the wood out is always a good idea. I used my random orbit sander to do most of the heavy lifting. I started with just over 100 grit and moved up to 320 grit. I had to hand sand some of the tight areas, such as the leg openings.


Once sanding was complete, I could grab a tack clock and wipe off any extra dust on the piece. This prepped it well for the finish. I wanted the wood to pop a little, so I used some oil-based polyurethane to add some warmth to it. I made sure to sand with 320 between coats by hand. This helped to remove any extra fuzzies from the piece, too. After finishing, everything was done!
This project pushed me like no other has. It was my first time making kerf cuts, and one of the most modern and curvy designs to pop out of my head. I appreciate the Modern Maker Podcast for putting on the Rockler Bent Wood Challenge. Without the challenge, I would never have attempted a project like this nor learned the lessons I did along the way.

